Making Adjustable Kids Desks During a Pandemic - a Woodworking Endeavor
This is the story of how I’ve build two “grow-with-the-kids” kind of desks for my children during the Covid-19 pandemic, who were three and five at the time. It was a lot harder than I expected, not just because I was basically a noob at woodworking, or because of the pandemic, or because of physical and mental health issues, or because of unemployment, or because of a lack of focus.
It was for all of that.
But let’s start at the very beginning…
The Background to this story
A pandemic turns our lives upside down
When the pandemic took off in the US in March 2020, my wife and I quickly had to come up with a setting of a shared home office for us, but to prepare for distance learning our kids would likely have to do. Our son, at the time in Transitional Kindergarten, had just gotten a Chromebook from his school and was expected to use that to learn and play. Our three year old girl enjoyed hanging out with her brother when he used the computer, so a decent amount of space for both of them was needed.
A Makeshift “classroom”
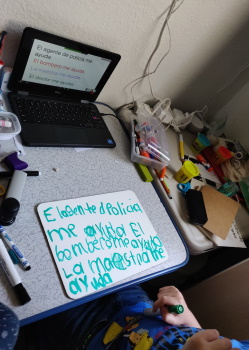 Luckily we had some regular kids chairs already, as well as a small folding camping table that we haven’t used in a while, and a lot of kids learning and crafting material, books etc. Even more importantly: we also have the luxury of having enough space available to set that all up without sacrificing too much elsewhere. But quickly this “class room” turned into a mess with all kinds of crafting and drawing stuff, drawings, books, about a hundred crayons, pens, etc. and somewhere underneath this mess - a Chromebook.
It didn’t take long for us to realize that the space wasn’t nearly as spacious as it would need to be to accommodate for all the equipment a TKer and a toddler would need for likely an entire year of remote learning. So we added another, even smaller, camping table to store some of the stuff, making more room to allow for the actual “work” on the makeshift desk. Alas, it still wasn’t enough.
Getting started
It became clear that we would need to invest into some extra kids furniture, way earlier than we anticipated. The biggest problem was that all stores were closed due to the human malware that had already shut down most western countries. Not even the well known Swedish store was able to deliver anything, not to speak of anyone else or getting something anytime soon online. My wife had sent me several links to products in catalogues online, showing the designs she liked, but none of these were both affordable and available.
So I decided to build something myself - how hard could it be?!?
For a couple months I was already enjoying woodwork, though often in projects that I either didn’t finish because I underestimated them, or I butchered them, or I just made them work somehow. Though I was also building tools and jigs to get started with new techniques etc.
So from todays perspective I could very well just have ordered some desks from a random store, and very likely would have saved money - and a lot of time.
But I didn’t.
Ideas and designs
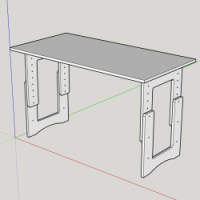 Instead I first learned how to create 3D models of my thoughts (which I scribbled on paper before) in
 SketchUp, so I could try out different ideas and designs. I came up with a promising model, that my wife liked too, and which - after quite a lot of modifications, and made out of expensive but crappy plywood (more on that later) - would eventually stand in our kid’s room.
But it was not until 15 months later that the desks were finally replacing the flimsy camping equipment…
Tools: store-bought, alienated, home-made
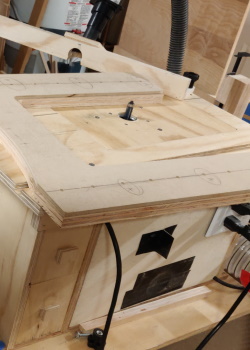
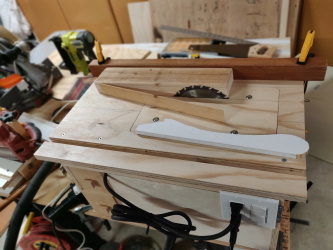 The very first thing I’ve actually built when I started woodworking was a small table saw: a handheld, battery-powered 6-1/2 inch circular saw, mounted upside-down into a small home-made plywood table. It even had a modular setup, allowing for the use of multiple plates that had different tools mounted to them: a jigsaw (turning it into a scroll saw), a router (making it a router table), and said circular saw as table saw. I also made a crosscut sled for it, because, safety, you know. Soon I swapped the battery powered circ saw with a 7-1/4 inch chorded one, that had more power - and didn’t require me to reach underneath the table to turn it on and off (remember, safety?). Instead I mounted a power outlet and a switch that allowed for easy, direct and relatively safe operation of the whole setup.
However, though it came in very handy as a router table, as a saw this was way too small for what I was trying to achieve with my desk build. So I opted for an actual table saw instead, though by that time tools became less available and more expensive each day due to pandemic-related shortages. And of course I also needed other tools - a better working, battery powered jigsaw, a handheld router, another drill, etc.
Obstacles
Getting sidetracked
With the new drills, jigsaw, bits, batteries, chargers etc. I needed storage to put all that away when not in use. So instead of a desk the next thing I built was a station for these tools where everything was neatly and accessibly stashed and sorted, and the batteries charged, all hung up at a wall, equipped with an also newly built french-cleat system.
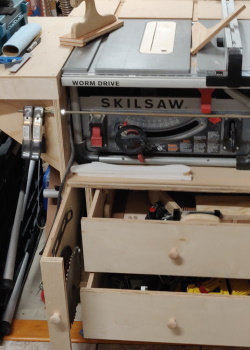
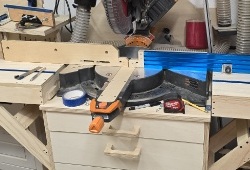
When I finally got the new table saw I had to build a stand for it first, of course - it obviously needed a nice place to sit on, with additional storage as well as an outfeed support. So I used my newly developed CAD skills to adopt a design from a magazine, made it my own, and then built a cart from a sheet of big-box-store plywood. As so often its quality was sup-par at best, forcing me to improvise here and there, but it worked out surprisingly well at then end.
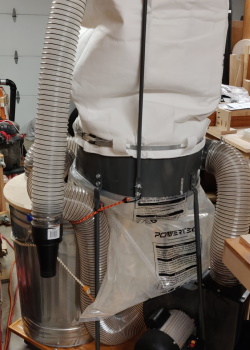
Now that this was out of the way I “quickly” built a bigger dust collector system, consisting of a second hand impeller unit, a bunch of flexible hoses, a trash can and - again - some plywood. The system I used before (also DIY, but made from 5gal buckets and a shop vac) was too small for bigger jobs like this desk build was going to be.
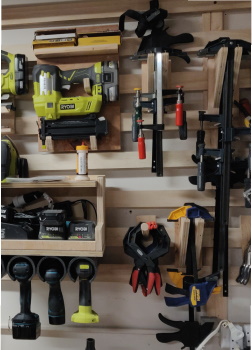
Now it was finally time to get started with the actual project.
I did, but not for long.
Sickness, Anxiety, Unemployment
By the time I actually started building the desks, I got sick. Somewhere between building these things for the shop, and using them for a couple other projects which I’ve squeezed in (i.e. a key rack, a spice rack, a bluetooth speaker for the kids), I’ve gotten myself a really bad tendonitis that unfortunately turned chronic. With the support of medicine and therapy I got at least the plywood cut up, shaped all parts as needed and made some changes to the design to adopt it to my now increased understanding of the material. I even made new templates when I noticed that my idea of the height adjustment wasn’t working properly.
At the same time my daytime job as a DevOps engineer got more and more demanding, leading to a burnout - which I refused to see at the time. I didn’t even acknowledge this when my employer decided to cut down expenses and laid off some people - including me.
For the next three months I was very actively (but unsuccessfully) trying to find a new occupation. By that time we were over six months into the pandemic, living on one income, had two little kids at home all day, and couldn’t see anyone else. Worse though, I wasn’t really there for my family, instead tuning my CV, working on assignments for job applications, learning Python, etc.
Even then I kept spiraling down into the burnout.
And as if that wasn’t bad enough I started delaying the work on the desk project:
- I did see issues with the design and the stability
- I was afraid to mess up the finish
- I didn’t know how to make sure all holes will be drilled accurately etc.
Over the holidays at the end of 2020 I then had to accept the fact that things were out of control. I had to accept that I needed to change something - ASAP.
Since I wasn’t able to get myself out of this hole (and thanks to the influence of my wife), I got myself professional support to address the physical and mental health issues first (good thing that I still head healthcare coverage). Not only did this help me feeling better and to change my approach in finding a new job, it also helped me in re-assessing my general situation and the projects I had started but not yet finished. I’ve reset my priorities for family, job and woodworking, and things started to turn around. Not only did I finish some other projects I’ve started to work on during the pandemic, I’ve also found a new job that I like, and that leaves me enough room to be there for my family and to pursue my hobbies.
And I finally got back to building these desks for my kids. I understood that I kept delaying the work because of things that weren’t real problems, at least not until I would actually encounter them. And I’ve learned that sometimes, if I wonder if something is going to be a problem, it could help to ask others who are more experienced than me, or who simply have a different or unbiased perspective.
Ok, now let’s get back to the build itself and which materials were needed.
Materials
Birch plywood
If you made it that far reading my blog you may have already noticed:
I do like Plywood.
Plywood is a very stable material, well suited for making furniture. And with the right finish the grain and even the edges can look very pleasing. And it has a very good value for money ratio, too.
Well, it can.
Unfortunately when I started with this project I wasn’t very experienced yet and bought the wrong plywood. Ok, not really the wrong plywood, but not something really good either. I got some birch ply from a local lumber store where they are more focused on construction lumber. And that shows in the quality of the birch ply I got. The main flaws were:
- The veneer on both sides was so thin, that in some spots the underlying layer started to show already.
- There were so many voids in some of the inner layers, that when trying to fill one during the build a tooth pick fell in on one side, just to fall out on the other end of the sheet.
- The “bad” side of the sheet, where patches and fillers were applied visibly, was also the side that had the nicer grain pattern.
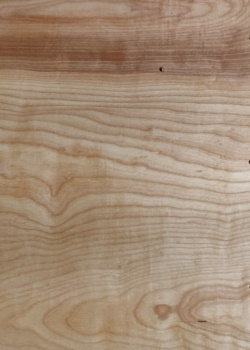
However, the grain pattern still looks gorgeous, doesn’t it?
Initially I’ve also planned on applying an edge liner, but it turned out to be such a PITA to put on that I decided to leave it out and just see the imperfections as features. Though it forced me to use a lot of wood filler on the edges to make sure I can seal everything off nice and smooth.
Hardware
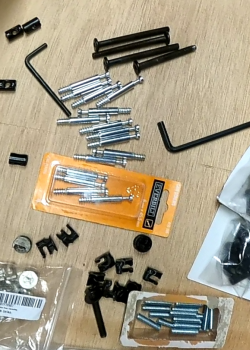 For joining the individual pieces I ultimately decided to use knockdown furniture hardware: cam lock and barrel nuts, plus their respective bolt counterparts. Initially I had thought about using wooden dowels that I would glue in, but this would have made it almost impossible to later replace individual parts if ever needed, e.g. to replace the top, or use a larger one.
Unfortunately this made the whole build so much more complicated, but I stuck with the decision anyway.
To hold the legs together I’ve tried to get some furniture bolts with their fitting nuts, but was unable to find the right length. They couldn’t be any longer than two layers of 3/4 inch plywood (which technically is usually only 23/32 inch thick), but also needed to be long enough to safely engage when screwed together. Since there were none available that would satisfy both requirements I ended up using nuts on both sides, connected by a 1 inch threaded rod, of which I ordered a bag of online (because cutting them myself from a longer rod turned out to be way too tedious).
Jigs, templates and special tools
To make sure everything fits perfectly on all pieces (hahaha…more on this later) a woodworker inevitably needs jigs: self-made tools and holders to guide blades and bits in a specific, accurate and repeatable pattern, way or distance. I’ve made some jigs specifically for this build, i.e. to route all holes for the leg connectors at the exact same places on each piece (a total of 128 holes), as well as one for the whole where the cam lock nuts furniture bolts were going to be. Others I already had, like one for drilling centered holes for dowels or cam lock bolts into the edge of a piece.
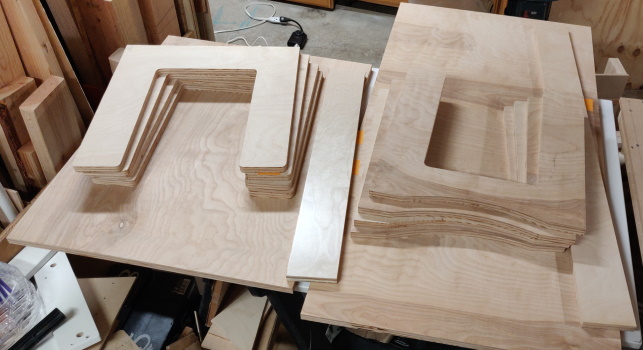
 I made templates for the leg pieces as they all needed to be the exact same size, but in two different versions: the lower part would have an arc at the bottom for a more stable stand, that the top piece would not have. Also, having two pieces of basically the same shape allowed for testing of the actual height setting was working or not - which it wasn’t, of course. This way I found out that just “carefully marking and drilling the holes on the drill press wasn’t cutting it (hehe, see what I did there?). The holes turned out slightly off, just enough to make a smooth setup impossible. That’s another reason why I’ve changed the plan eventually to use connector bolt nuts on both sides and a threaded rod to connect them both (as explained earlier).
To make sure all the hardware would fit perfectly I’ve also had to get weirdly sized drill bits (i.e. 11/64in), as well as spiral (3/8in) and straight plunge (19mm, 10mm) router bits, and template guides that would also fit these. Another router bit that I had trouble finding first was a 1/16in round over bit, that is used to have a uniformly smooth edge all around your workpiece.
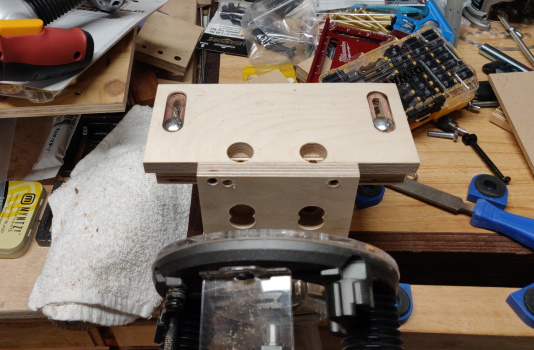
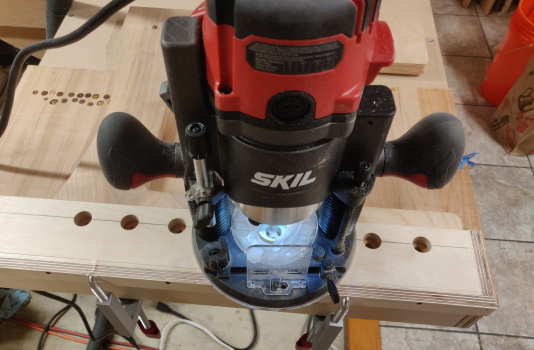
“Unfortunately” some of these router bits needed a 1/2in shank router, which I also had to buy (yay, new tools!) first.
Also I noticed I need better saw blades for cutting hardwood plywood - but not before already messing up some of the cuts.
Finally I also got a spray gun for applying the polyurethane finish (at least that’s what I wanted to do).
Finish
As a finish I decided to go with an oil-based, clear, semi-glossy polyurethane. The two reasons for this were:
- Oil-based poly ambers when it cures, giving certain woods a nicer contrast than a water-based poly. I was hoping it would make the grain “pop”, making it appear kind of more lustrous.
- Polyurethane dries really hard, making it very good for highly stressed surfaces - like a kid’s desk. It is also waterproof which makes it easy to clean.
The plan was to wipe some thinned poly onto the legs and support board as well as to the underside of the top. A lot more was going to be sprayed onto the top and its edges to make sure of the best protection possible.
The actual build
Cutting the birch ply
When I knew what sizes I needed I started tracing the pieces contours onto the sheet of plywood, making the best use of the available material. One sheet still wasn’t enough, which is why the support board on the smaller of the two desks is actually made from a different sheet of plywood, a leftover piece of my table saw cabinet build.
However, I’ve cut the tops and the other support beam from the birch ply on the table saw, leaving bad burn marks from the apparently not sharp enough saw blade (duh!) on some of the edges. Then I used the jig saw to roughly cut out the U-shaped pieces for the legs. I made sure to leave enough material to be able to use a router and a template later to trim the material to it’s exact size and shape.
Routing to size
The leg pieces I then took to the router table, taped the templates on and routed the final shape with a trim bit, using multiple passes with light material removal to not mess up those edges again. To break the angles on all pieces I used the 1/16in round-over bit in a trim router as this gives a more uniform appearance around the hole project than sanding it.
Holes - drilled or routed?
I’ve tried to drill all holes first, but that was one big mess and one of the points where I was ready to give up. For the life of me I couldn’t get these holes aligned properly, or just straight at least. So after building the respective jigs I used several router bits to route all the remaining holes. The only other holes that went ok with a power drill were those where the cam lock bolts would sit in.
Test fitting
When I’ve finished cutting and drilling all parts but the top I did a test fit of the whole thing to verify it works. When it did I used center pins for dowel/tenon drilling to determine the exact places of the cam lock bolts . Then drilling the holes with a brad point bit and - voila - the bolts were ready to be set in.
Another quick test to verify the overall fit and it was ready to go on and finish the project.
Putting on the finish
Oh man, this was one of the hardest things ever. I’ve used my home-made wipe-on poly to finish the legs first. That was relatively easy and went without further problems.
But then I had to do the desk’s tops. This was an absolute nightmare:
- I tried to spray on some thinned poly, that looked like orange peel once it had cured.
- Sanding a little in between layers of sprayed on poly didn’t smooth out the surface enough, so I ended up sanding it off almost entirely.
- Brushing the poly on without thinning it lead to such heavy brush marks that it took a lot of sanding to even out the surface again.
- The first desk’s top probably got a total of one dozen coats, but only three or four ultimately were left on.
When finishing the second table I approached the process a little different:
- I thinned down the poly with mineral spirits, roughly by around 10%.
- I used foam brushes to brush on this mixture to produce a more uniform surface.
The results are … ok-ish. The first desk’s top looks a lot more plasticky due to the many coats and all the sanding, even when polished with brown paper. But it is also really, really smooth.
The second desk looks more natural, though it also has a nicer grain pattern, but doesn’t feel nearly as smooth. However, it is good enough, and since this is also the smaller of the desks it likely will get a new top in a couple years anyway - and then I can do it right.
Final assembly
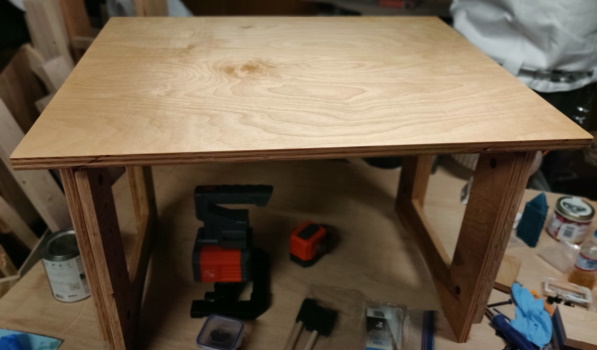
When all pieces were finished, the clear coat cured, the smell gone and everything cleaned up I’ve put them together. the smaller top had some alignment issues with the cam lock bolts, but I was able to wiggle everything together eventually.
When it came to setting the proper height there was a last surprise waiting: the lowest setting of the table height (18 inches) wasn’t working: the holes in leg pieces were about 1/32in off on each part, making the leg pieces not sitting flush with each other, and having the lower pieced getting in the way of the top. To fix this I will need to adjust the jig for these holes to get a 1/32in offset on one side of these parts. But in this case, since my now four year old has the size of a five or six year old, this isn’t a real problem as she can use the second lowest setting (20 inches) already.
Conclusion
I remember at least 3 times where I seriously thought about quitting this build. There were the quality issues of the material. Then I had so many doubts about the stability of the desks, that I wasn’t sure I should follow through with the build at all. And when these holes weren’t lining up I felt so embarrassed that I throw in the towel again.
What helped then was discussing it with my wife.
Not only made my confession to her about my procrastination me realize, that I did exactly that - procrastinating, but also prompted her to assess the design a little more. And though she has absolutely no idea about woodworking, but a lot of experience in putting together furniture from blue-yellow stores and the likes, she was very helpful in determining which exact design to use for connecting all pieces. She reminded me that these desks won’t need to be sturdy enough to dance on them, but that with what we know from store-bought furniture and it’s knockdown hardware this would be plenty stable.
And she gave me a lot of emotional support when I needed it, too, especially after losing my job in the middle of a pandemic that already brought lockdowns and other limitations. If it wasn’t for her (my wife, not the pandemic) I’m sure it wouldn’t just have taken me much longer to finish this build - I likely wouldn’t have finished it at all.
I really love her, and I’m thankful for her supporting me at my worst, believing in me, giving me the space and time I needed to recover and pull this build off.
And I love my kids, too. Seeing how they like their new desks, and knowing they will have a proper place for school work, drafting, or another block of remote learning, was totally worth every single aspect of this project.
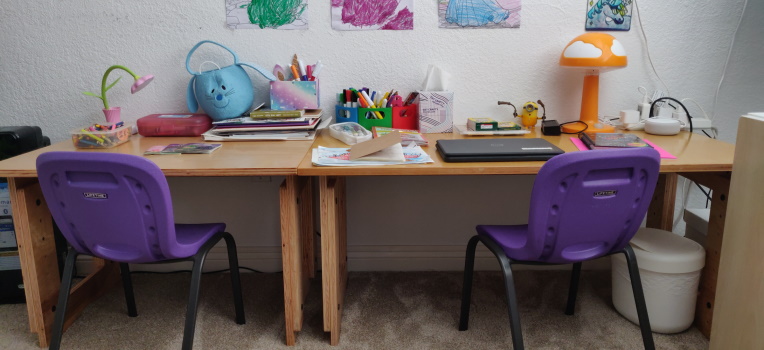
Though I’ve definitely learned a lot of new things, I probably should buy the next furniture at the store again, shouldn’t I?
Nah, I probably won’t…


Comments